Pages

Sunday 29 March 2020

Virtual roleplaying part 7: connecting a player, My First Encounter

Time to break out of your lonely existence and let the players connect! Actually, for now, you get to test it yourself, but the principle will be the same.

Make sure you have a scene active in your GM connection in FoundryVTT, then go to the Settings right hand menu, select Invitation settings and (for now) copy the Local Network link. We'll cover players from outside your network in a couple of posts time.

Start up another browser: if you're running on Windows or Mac, the FoundryVTT app hosts the game and (probably) your GM connection [if you're running on a dedicated server, you'll already be connected in one browser, and you need to connect to the game again in a separate browser]. Either way, paste that link into your browser and connect. You should see a familiar dialog, so select the Player name and enter the access key you set for it, then hit Join Game Session. Two screens will help here if you have them!
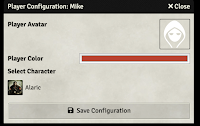

The first thing you'll see is your Player Configuration dialog - all you really can do here is change the colour of your player icon, and if the GM has given you permission, upload your player portrait.

Once you click Save Configuration, you'll find yourself in the dark :D

Go to the GM session, drag that player's character actor onto the map, and give them a torch like we did last time (don't forget to hit Update Token). In the player window you'll see them appear and the scene light up.

Drag the goblins onto the map in the GM window, if they aren't already there.

It's not that easy to watch when you're controlling both, but you will see a little dot with the player's colour that indicates where their cursor currently is - this is useful if one of you wants to point something out to the other. If it gets annoying, the GM can turn it off (somewhere, I'm sure. I saw that config option and now I can't find it!!!).
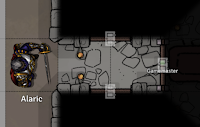
Anyway, here's Alaric, as before, in the temple entrance with a torch, but this time under player control.

You can use the cursor keys or the numeric keypad to move him, and Control+scroll wheel to rotate him, as before. So, like we did before, let's stroll up to that ominous looking door...

... and open it by left clicking on the little icon.

Cue dramatic music! (Yeah, yeah. It is supported. We'll get to it later!)
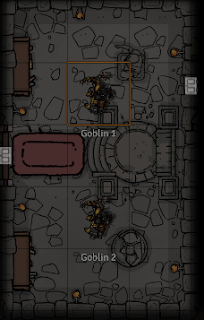
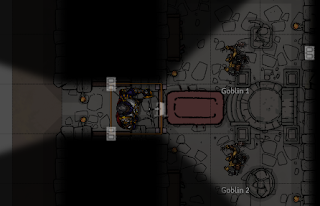
Player's view.
GM's view with no icon selected.
It's combat time!

Go to the Gamemaster window, make sure you've selected the topmost icon on the left (Basic Controls), and Select Tokens next to it, and drag a box round all the active tokens. Bring up the Combat Tracker in the right hand menu (second icon from the left) and right click on any of them, to bring up the Combat HUD (of which more shortly) and click the bottom right icon to add all the tokens to a new Encounter. (By the way, if you Control-click on the Combat Tracker icon, it will pop out into a window you can move about.)

Click on the icon to the right of the +, which will roll initiative for the NPCs.

If you go to the chat window (in either window, but let's do it in the player's browser), you'll see their rolls. Now bring up the Combat Tracker in the player's window as well, and click on the d20 next to his name to have Alaric roll his own initiative.

Finally, back in the GM window, hit Begin Combat.

If you click on the currently active monster (in my case Goblin 2) it will select and highlight. Let's pick on Alaric: right click to bring up the combat HUD on him, left click on the target icon (bottom left) to target him.

Bring up the goblin's sheet, click on his bow icon to roll an attack. The shortbow card will come up in chat, (with Attack and Damage buttons in the GM window but not the player's): click Attack.

We hit (just! Alaric is AC18) Roll for damage.

It's not that I'm picking on the poor guy, my dice just don't like him much.

Before we carry on, let's pause and take stock of the things that, in our excitement to get started, we're probably now noticing that aren't as good as they could be.

For starters, Foundry doesn't tell you if you've hit or not, as I commented in a previous post. It also doesn't apply the damage. Both of these we can fix later with a module. For now though, we can edit his current hits by bringing up Alaric's combat HUD as the GM by right-clicking, and editing the big number at the bottom (not the one top left: that's his height above ground level).

While we're here, click on the gear wheel: this brings up the familiar token config dialog. Go to Resources, set Display Bars to Always, and Bar 1 to attributes.hp. Save Configuration, and do the same for the goblins. Here you may berate me for not telling you to do this in their Prototype Token config earlier (so do it now - I'd really like a master Prototype Token where I could turn this on for all tokens, if you're listening, Atropos.)

Now at least all our combat participants have health bars. We can move Goblin 2 out of sight of the door and click the right arrow on the encounter tracker to advance to the next combatant.
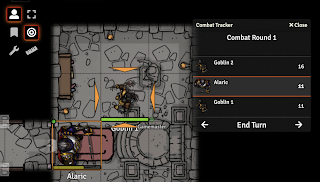
Alaric's turn. Being at least somewhat of the tank persuasion, he'll go whack Goblin 2. Over to the player window.

Now. Because he's not the GM, he can't bring up the HUD on a token he doesn't control, so to target the unfortunate goblin, we select the target icon (second down, second column on the left) and click on Goblin 1.

It's clobbering time!

Woah. Hold on a sec...

Remember we discussed the button bar last time? Ok. Double click to open his sheet, go to Inventory and drag the longsword icon to the bar, close the sheet. Now when we hit the button (or the appropriate key on the number row, the item card appears in chat with Attack/Damage buttons. Alaric rolls to hit...
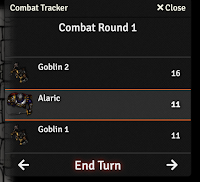
He hits (after several attempts - I never said this wasn't a rigged demo!) and gets to do damage. As before, this doesn't get updated automatically, so we have to do it by hand, as the GM, by editing the hits in the combat HUD. Alaric's player can now hit End Turn on the Combat Tracker, and it's Goblin 1's turn.

Right. Hopefully you begin to get the idea.

We're going to leave it there for now: feel free to play through a bit more of the fight and explore what the HUD does, roll for Advantage etc. There's no substitute for having a play, and you can always wipe the encounter and start again.

Next time, having demonstrated how much nicer life could be than this, we're going to install a module to help with combat.

Aside: I am very much of the opinion that it's worth learning how to do things in completely vanilla FVTT before you start adding modules, as a) you gain a better understanding of core concepts, and b) you get a better appreciation for which modules scratch your personal itches.

Till next time. Stay safe, and roll good (virtual) dice.

Upcoming posts (subject to change as I go):
  • part 8: combat helper module(s)
  • part 9: player communication

Saturday 28 March 2020

Virtual roleplaying part 6: images, tokens, monsters, light

Right. Diving straight in, let's go to the Actors list (RH icon menu, 4th entry) and drag our lonely actor (Alaric in my case) out on to the map.

All very well, but the mystery man token isn't particularly inspiring, any more than the matching portrait is, so let's click on him to select him if he isn't, hit the Delete key to remove him from the map, and do something about that. Before you do, this is the point where you might want to have a think about how you want to organise your tokens and images on disk.

On the Mac, your User Data folder is in ~/Library/Application\ Support/FoundryVTT/Data/ - in Windows it's in %localappdata%/FoundryVTT/Data/ (don't look at me, I'm a Mac user) and in Linux it's wherever you put it (typically ~/foundrydata/Data/). Under mine I've created an images/ directory with subdirectories for tokens/ and portraits/ for the ones I upload. You can copy stuff in by hand using your operating system tools (easier when you're dealing with lots of files), or use the upload feature on Foundry. 


Image licensed under CC BY 3.0 by David Revoy
Once you've done that, go back to the Actor tab, click on Alaric's name to bring up his sheet. If you click on his portrait, you can replace it with another image via the usual FVTT file dialog - navigate up to the top of User Data, find your portraits/ folder and select the file.

That looks much better. While you're there, click on Prototype Token.

Ok - important note here. The Prototype Token is the one all copies of this Actor will start out with - not important for a character, but monsters are also Actors, and when you drag multiple copies of them out onto the map, they will all pick up the Prototype Token to start with. You can edit them later, of which more in a bit.

Right. So, assuming we have a handy token image for Alaric, let's assign it to the token (if you don't, it'll use the portrait).  Click on the image tab, find a token in the file browser, don't forget to hit Select File, and there you have it. On the Character tab, lets set Display Name to always, and hit Update Token.

We'll cover other useful things you can do from here in a bit, but for now that's it.  Drag your token back onto the map and admire it.

When you click on your token, you'll notice that he doesn't see much. That's because it's dark, and he's human. So lets really ruin his day, by giving him some opponents who can see in the dark.

First off, though, let's get ourselves a bit more organised. Go to the Actors tab, select Create Folder, and create two folders, one called Parry, one called Monsters. Drag your character into the Party folder, then open up the Compendiums tab, single click on Monsters (SRD) and find the goblin. Click back to the Actors tab, and drop the goblin from the Monsters window into the Monsters folder. You can get more adventurous with this organisation as you see fit, obviously.

Now for some fun.

Open the goblin's Sheet if it isn't, click on Prototype Token, set Display Name to Always, and then go to Vision. Goblns have 60' darkvision in 5E, so check Has Vision and enter a value of 60 in Dim Vision (Grid Units are feet in D&D, not squares). Update Token, and now all goblins you drag from there can see in the dark.

Muahaha. Poor Alaric.

Now let's do exactly that - drop two green-skinned nasties onto the map by dragging the image from the Actor panel twice.

Three things you'll immediately notice.
  1. they're almost certainly facing the wrong way.
  2. they're both called 'Goblin', meaning if your players want to tell you which one they're referring to, they're going to be saying things like 'the one by the statue - no, the other one....'
  3. the map is lit around each of them when you select their token, for 60', but they don't see through the walls we created a few posts ago - remember those? Neat, huh?
1 is an easy fix: select a goblin, hold down Control and use the mouse wheel to rotate it.

2 is only a little bit harder. Double click on one of them. Notice that where the master sheet said "Prototype Token", this one only says "Token". Any change you make here only affects this one token. So let\s change its name to Goblin 1, and the other to Goblin 2. (Other goblin names are available.) 

Note one useful side effect here - if your custom monster is called (say) "Cult of <some God your players can't know about yet> Acolyte', here's where you can change it so they don't know yet. 

Poor Alaric is about to wander into the temple in the dark. Let's help him out by giving him a torch. Hit Escape to deselect the goblin so you get back to the all-seeing GM view, then double click on his token to bring up his sheet, go to Token, go to Vision. This time, set Emit Dim to 40, and Emit Bright to 20, for a standard D&D 5E torch light source that will move with him. Remember to hit Update Token, and close.

If you click on Alaric now, you'll see he is emitting light. (In 0.5.3 you'll be able to change the colour of the light, so that he has an even more dramatic orangey-red torch.) But, because it's only set on that token, not on the prototype, the next time you drag him onto a map he won't have it.

Move him by dragging him, or using the cursor keys or the numeric keypad, and watch how what he can see, and what's illuminated, changes. Walk him up to a door, and left click on the little door rectangle icon until it changes to open.

How cool is that?

Ok. That's it for tonight.

Upcoming posts;
  • part 7: player connections, movement, targeting
  • part 8: more useful modules.
Tokens: Devin's Token Site has some great free token packs. While you're there, the for-pay ones are mostly only $5 each, and they're excellent. Show the man some love.


Virtual roleplaying part 5 - players and characters

If you look in the bottom left of your Foundry screen, you will notice a sad lack of players, logged in or not. So let's rectify that.

All your players need to connect is a browser, preferably Chrome or Firefox, a working network connection that can reach your installation of Foundry, and for you to create them a player. Off then, to the Game Settings menu again (far right, remember), and hit Configure Players.


Once you're in this dialog, hit Create Additional User, give them a name and an Access Key (password to you and me, although apparently not as secure, so usual advice about not reusing passwords from elsewhere definitely applies!): for now we can leave the Permissions Level as PLAYER (some of this may change in version 0.5.3, I gather) and hit Launch Game Session, which will restart your game.

If you look in the bottom left, and hit the downward pointing triangle to reveal the list of players, you now have a new player (in my case, me).

Right clicking on their brings up a menu: if you select Player Configuration you can assign them a colour, and a character....

But wait, we don't have any characters yet!

Let's go to the Actors tab (fourth one along on the right hand icon menu), and hit Create Actor then.

Give them a name (there's a NoPrize if you know where Alaric gets his name originally), make sure the type is set to Character, and hit Create Actor.

Because we have the D&D 5E module installed, up will come a familiar looking sheet. If you have VTTA's D&D Beyond module installed, you can populate the sheet from there (and I'll cover that in a later post). However, because it helps understand some core concepts in FVTT, we're going to build his sheet by hand. 

Probably the first thing you're going to notice here is that you're madly clicking on Level or the XP and nothing happens to change their Level. So....

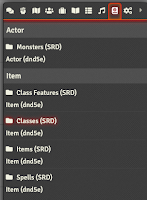
Go to the Features tab on the sheet. Then go to the Compendium tab on your right hand icon bar (second from last) and single-click (not double, however much you may be tempted! it'll just appear and disappear again if you do...) on Classes (SRD).

Up will pop a window over on the left, with a list of classes, each with an icon. Left-click and hold on the one you want (in this case, Fighter), and drag and drop it onto the Features area in the character sheet. You'll see icon appear under Class Levels, and the Level on the sheet go up to 1. Nifty, huh? (If you want to start them at a higher level, click on the little edit icon to the right of the class in the sheet, go to the Details tab and change the level).

As they're a Fighter, they also get to pick a style and the Second Wind feat, so let's go back to the Compendium tab and click on Class Features (SRD). Up will pop another window, from which you can drag the appropriate features into the Features tab. 


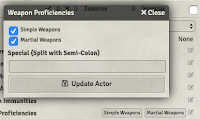
Now we can go back to the front page, and set Alaric's stats and skills. Be aware that the core D&D 5E system does not do a lot in the way of cross-updating, so just because you've given him a level of Fighter doesn't mean he's going to have the right weapon and armour proficiencies (or armour class, or hits...). Let's fix that. Click on Weapon Proficiences (bottom right area, Attributes tab, then on the little edit icon. Select the correct proficiencies, and hit Update Actor.

Then give him some items, which is done in the same way - go to the Compendiums tab, open the Items (SRD) Compendium, and drag across. Note when you do so, that (for example) when you drag across armour, it comes in listed as Not Proficient when you click on it, even if you updated the character's Armour Proficiencies. 

Again, hit the edit icon on the right, then the Details tab, and you'll find a checkbox for Proficient - click it and save.  Oddly, you don't seem to need to do this for weapons! Also, note that just because he has chain equipped, doesn't mean his AC has updated, so you will have to do that by hand as well. 

We're also going to give Alaric a longsword and a shield, and some basic kit. Note that if you want to give him multiples of something, you can edit the item and set the quantity in the Description tab.

So here he is with a collection of, erm... stuff.

Let's preview a couple of the neater features while we have his sheet open. Go to the chat window (first icon in the righthand icon bar), and then click the icon for his torches. 

You'll see a description of the torch appear in the chat window. The Use button doesn't do anything terribly handy, but it does serve as a useful way of displaying the item stats for everyone.

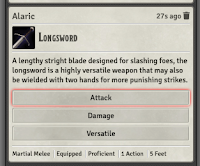
More useful, though, is if you do this with the longsword. A bunch of handy things happen.

First up, the item 'card' that pops up in chat has Attack and Damage buttons (as well as a Versatile button if your weapon has the attribute). So lets go ahead and click Attack,
Another dialog pops up, and we can roll for the attack, with various modifiers. The result will appear in the chat, but note that as yet we have no way of knowing what you're aiming at, so it can't yet tell you if you hit or miss.
Never mind. That's what the players have you for.

Let's assume you hit. Click on Damage, and you get another handy dialog for bringing the hurt.
And here's what those two look like in the chat window. If you click on the result, it'll tell you how it got there.

A few things to be aware of at this point. Yes, it's a pain having to bring up your sheet to click on the item to get the dialog in the chat box... That's what the button bar along the bottom is for - you can drag the item's icon to a slot, and then click it or hit the appropriate key on the number row...

And you'll get an error...


...because you don't have a token for your character on the map yet. We'll fix that next time, when we start on tokens and images and stuff.

One last thing before we finish: go back to the Actors tab, right click on your new character, select Character Permissions, and assign your new player as its owner. If you now go back to the Player Configuration dialog (right click on the player name, bottom left), you'll find your player and character are now linked.

A huge thank you to the folks on the FoundryVTT Discord, who have answered questions and critiqued these posts as I've been writing them. I'm FleetfootMike on there: feel free to comment and suggest improvements - this is as much a voyage of discovery for me as you :D

Till next time!

Upcoming posts:
  • part 6: tokens, images, monsters
  • part 7: player connections, movement, targeting
By the end of part 7, you should just about be ready to run a game, as long as you're still happy resolving hits, removing hit points etc. From part 8 on, things get clever. 

Friday 27 March 2020

Virtual roleplaying part 4 - module configuration, walls

Let's install and activate a module to fix your map, just in case. Assuming you're still in Foundry, hit ESC (top left of your keyboard) and Return to Setup. This should take you to the familiar Setup screen. Select the Add-on Modules tab, and then click Install Module.

We're going to install the GridScaler module. Copy its manifest URL (which is probably here), paste it into the form and hit Install.

[Note: there is a native grid alignment tool coming in Foundry 0.5.3, but in the short term, GridScaler is what you need - besides. it's good practice at installing a module!]

Now go back to the Game Worlds tab, launch your World and go to the settings tab on the far right.

Hit Manage modules.

You will be presented with the Module Management dialog, which has a list of all the modules you have installed (currently exactly one!): make sure the checkbox on Grid Scale Menu (yes, the module name changes for some reason) is selected, and then hit Save Module Settings at the bottom of the window.


Your game world will reload.

Now go back to the Settings menu, and select Configure Settings, and then Module settings.

In this case there are no settings for your module, but in others there may be, so it's always worth doing this when you add a new module.

I always find when I add new modules it can be less than obvious where the features have been added: in this case its easy: look on the button menu on the left, and you'll see a new icon - a spanner. The module actually has copious documentation on how to adjust your grid, so I'm just going to point you there if you need it rather than make this post even longer!

Ok. Now your grid is properly lined up, let's draw some walls!

Back to the left hand button menu, and select the temple icon. You'll notice that the second column changes to a new set, which are, from top to bottom:
  • Draw Walls (selected by default)
  • Invisible Walls
  • Terrain Walls
  • Ethereal Walls
  • Draw Doors
  • Secret Doors
  • Clone Walls
  • Clear Walls
Drawing walls is easy: left click and hold at the start, drag to where you want and let go, there's a wall. If you change your mind in the middle, right click before you finish and the wall will go away.

Now, this is all very well, but it creates a whole bunch of individual lines - what if you want them joined up? Easy. Left click and to start, then hold down Command (on a Mac, Control on anything else). Let go where you want the end point to be, do not let go of Command, click again, drag again, let go again, repeat. For the last point, let go of Command before you let go. 

Presto. If it all goes horribly wrong you can delete individual walls by double-clicking on and end point then hitting the Delete key, or the whole lot with the Clear Walls button.

Notice that I've added a point at every doorway. If you don't want the chore of drawing doors separately using the Draw Doors tool, you can turn the section of wall across the doorway into a door, by double-clicking on it.

This will bring up the Wall Configuration dialog: change Is Door? to Door, click Update Wall, and away you go. The piece of wall will change to blue, and now it's a door (which means when you go to the normal map view, you can click on it to open and close it).


Of course, if you've imported a big map from Dungeondraft, this is a LOT of clicking. There's a module that will help you. Clear the walls you've drawn so far, and using the instructions above, go and install DungeonDraft Importer (I'll wait).

Ok? Done that? Good. Now, once you've enabled the module. go to the Scenes tab on the right, right click on your scene, and select DungeonDraft Import. Note at this point it is very important your map image is imported at the right size.
Now you need to find your .dungeondraft_map file, and open it in a text editor. Copy the entire contents of the file, and paste it in the very minimal dialog box that appears in Foundry, and hit Confirm.

Et voilĂ , as they say in France. Complete with the doors correctly imported as doors (and yes, I forgot the secret door by the altar!)


Not that it hasn't imported the cave walls - this is currently a known limitation, so you will have to draw those by hand. It would also import any light sources you had in your map, but we'll get to that in another post!

Thursday 26 March 2020

Virtual roleplaying part 3 - maps and scenes

I'm guessing you're now all keen, and want to run a scenario on the VTT you just created. Ok. You're going to need a map.

This is not the series for discussing where to get maps, but I'n going to add a review of Dungeondraft (Wonderdraft's underground (and overground) cousin) later, and for now I'll be creating a map in Dungeondraft for the world of Testlandia.

Cue sounds of drawing, and, no more than 15 mins later (yes, Dungeondraft is that easy to use!), we have us a temple. (If you want to play with my map for now, the Dungeondraft map is here and the export is here.)


I've saved that, as well as exported it as a 128 pixels per square PNG (Dungeondraft's Export's Optimal Halved setting). I've also made a note of its physical dimensions, because that's going to make the next stage a boatload easier.

Back to FoundryVTT - sign in and launch your world, then sign in as Gamemaster. In order to allow players to wander over our map, we need to create a Scene. For this. go to the Scene tab (third from the left, top right) and then hit Create Scene.

You'll get the New Scene properties dialog. Fill in the important bits (circled in the image below) - most important, do fill in the size and the grid size in pixels to match your exported map PNG. You may also want to scroll down to the bottom and fill in the Navigation Name, which is the name your players will see it by, if the actual name is somehow spoilerific.

Then, you need to tell it where to find your map. Click on the icon all the way to the right of Background Image.

This file picker dialog is constrained to your FoundryVTT directories (this is deliberate, as it may be running on a hosted server,, and possibly as the system user, and for security reasons (trust me, I'm a professional) you really aren't allowed to go digging above that in the system areas!). Hit User Data, and navigate to the scenes directory of your world, which will look something like the image on the right. Note there are no files in that directory at present.

Now hit the Choose File button, and use your
computer's file dialog to find your map PNG file and upload it.

Presto, your map export will appear in the folder, and you can select it and hit Select File.

Now scroll down and hit Save Changes at the very bottom of your New Scene dialog.

If all goes well, you will have a map as the background to your scene, and, moreover, the grid on the map itself will exactly line up with the FoundryVTT grid. If it didn't, you have almost certainly got the dimensions and/or the grid size in pixels wrong. But don't worry, there's more than one way of fixing that - for now, click on the scene name top right and fix those numbers.


So there's your map. You can zoom with the mouse wheel, and pan around using Shift with the right mouse button. Not much, but it's a start.

For the next post, we're going draw some walls and install a couple of modules - one to help you if your map is misaligned with Foundry's grid. and one to save you some time if you're importing from Dungeondraft. Both these will also teach us some handy things (that I had to learn the hard way) about enabling and configuring modules.