All very well, but the mystery man token isn't particularly inspiring, any more than the matching portrait is, so let's click on him to select him if he isn't, hit the Delete key to remove him from the map, and do something about that. Before you do, this is the point where you might want to have a think about how you want to organise your tokens and images on disk.
 On the Mac, your User Data folder is in ~/Library/Application\ Support/FoundryVTT/Data/ - in Windows it's in %localappdata%/FoundryVTT/Data/ (don't look at me, I'm a Mac user) and in Linux it's wherever you put it (typically ~/foundrydata/Data/). Under mine I've created an images/ directory with subdirectories for tokens/ and portraits/ for the ones I upload. You can copy stuff in by hand using your operating system tools (easier when you're dealing with lots of files), or use the upload feature on Foundry.
  |
| Image licensed under CC BY 3.0 by David Revoy |
That looks much better. While you're there, click on Prototype Token.
Ok - important note here. The Prototype Token is the one all copies of this Actor will start out with - not important for a character, but monsters are also Actors, and when you drag multiple copies of them out onto the map, they will all pick up the Prototype Token to start with. You can edit them later, of which more in a bit.
We'll cover other useful things you can do from here in a bit, but for now that's it. Drag your token back onto the map and admire it.
When you click on your token, you'll notice that he doesn't see much. That's because it's dark, and he's human. So lets really ruin his day, by giving him some opponents who can see in the dark.
First off, though, let's get ourselves a bit more organised. Go to the Actors tab, select Create Folder, and create two folders, one called Parry, one called Monsters. Drag your character into the Party folder, then open up the Compendiums tab, single click on Monsters (SRD) and find the goblin. Click back to the Actors tab, and drop the goblin from the Monsters window into the Monsters folder. You can get more adventurous with this organisation as you see fit, obviously.
Now for some fun.
Open the goblin's Sheet if it isn't, click on Prototype Token, set Display Name to Always, and then go to Vision. Goblns have 60' darkvision in 5E, so check Has Vision and enter a value of 60 in Dim Vision (Grid Units are feet in D&D, not squares). Update Token, and now all goblins you drag from there can see in the dark.
Muahaha. Poor Alaric.
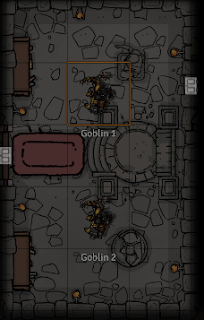
Now let's do exactly that - drop two green-skinned nasties onto the map by dragging the image from the Actor panel twice.
Three things you'll immediately notice.
- they're almost certainly facing the wrong way.
- they're both called 'Goblin', meaning if your players want to tell you which one they're referring to, they're going to be saying things like 'the one by the statue - no, the other one....'
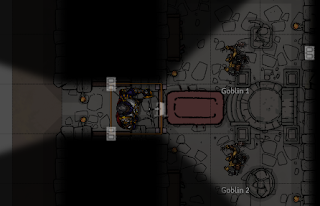
- the map is lit around each of them when you select their token, for 60', but they don't see through the walls we created a few posts ago - remember those? Neat, huh?
1 is an easy fix: select a goblin, hold down Control and use the mouse wheel to rotate it.
 2 is only a little bit harder. Double click on one of them. Notice that where the master sheet said "Prototype Token", this one only says "Token". Any change you make here only affects this one token. So let\s change its name to Goblin 1, and the other to Goblin 2. (Other goblin names are available.)
Note one useful side effect here - if your custom monster is called (say) "Cult of <some God your players can't know about yet> Acolyte', here's where you can change it so they don't know yet.
Poor Alaric is about to wander into the temple in the dark. Let's help him out by giving him a torch. Hit Escape to deselect the goblin so you get back to the all-seeing GM view, then double click on his token to bring up his sheet, go to Token, go to Vision. This time, set Emit Dim to 40, and Emit Bright to 20, for a standard D&D 5E torch light source that will move with him. Remember to hit Update Token, and close.
 If you click on Alaric now, you'll see he is emitting light. (In 0.5.3 you'll be able to change the colour of the light, so that he has an even more dramatic orangey-red torch.) But, because it's only set on that token, not on the prototype, the next time you drag him onto a map he won't have it.
Move him by dragging him, or using the cursor keys or the numeric keypad, and watch how what he can see, and what's illuminated, changes. Walk him up to a door, and left click on the little door rectangle icon until it changes to open.
How cool is that?
Ok. That's it for tonight.
Upcoming posts;
- part 7: player connections, movement, targeting
- part 8: more useful modules.
Tokens: Devin's Token Site has some great free token packs. While you're there, the for-pay ones are mostly only $5 each, and they're excellent. Show the man some love.


No comments:
Post a Comment